spring 定时几种实现方式
- 工作小总结
- 时间:2019-02-15 11:40
- 3597人已阅读
🔔🔔好消息!好消息!🔔🔔
有需要的朋友👉:微信号
项目中要经常事项定时功能,在网上学习了下用spring的定时功能,基本有两种方式,在这里进行简单的总结,以供后续参考,此篇只做简单的应用。
方案一:注解方式:
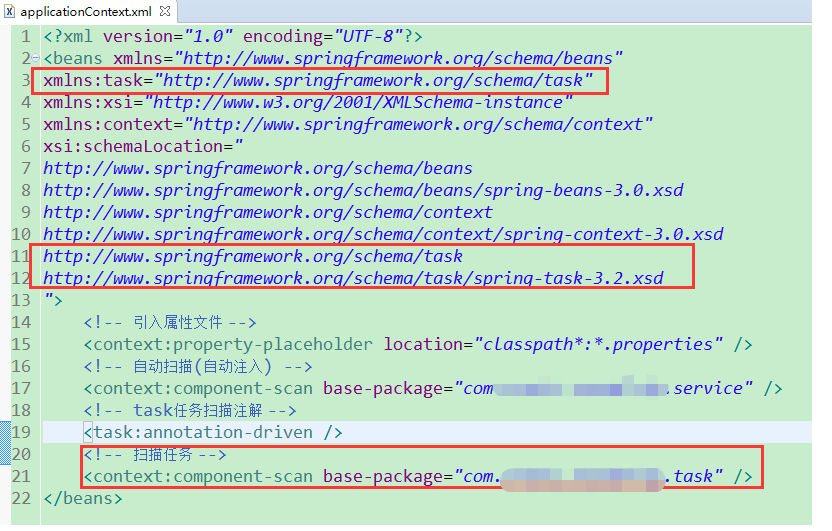
1.1.在SpringMVC配置文件中添加
xmlns:task="http://www.springframework.org/schema/task"
http://www.springframework.org/schema/task
http://www.springframework.org/schema/task/spring-task-3.2.xsd
1.2.配置任务扫描
<task:annotation-driven />
1.3.配置扫描任务位置
<!-- 扫描任务 -->
    <context:component-scan base-package="com.kaigejava.task" />
具体配置如下:
 示例代码:
示例代码:
package com.kaigejava.task;

import org.springframework.scheduling.annotation.Scheduled;
import org.springframework.stereotype.Component;

@Component
public class FlightTrainTask {
    @Scheduled(cron = "0/5 * * * * ? ") // 间隔5秒执行
    public void taskCycle() {
        System.out.println("使用SpringMVC框架配置定时任务");
    }
}方案二:不使用注解实现定时任务,将定时的功能在spring配置文件中实现。
xmlns:task="http://www.springframework.org/schema/task"
xsi:schemaLocation=" http://www.springframework.org/schema/task
        http://www.springframework.org/schema/task/spring-task-3.0.xsd”


<description>
        定时任务
    </description>
    //定时注解驱动
    <task:annotation-driven />
    //进行定时任务的类,将其定义为一个bean
    <bean id="spaceStatisticsService" class="com.pojo.system.manager.sigar.impl.SpaceStatisticsServiceImpl"></bean>
    //通过task标签,定义定时功能
    <task:scheduled-tasks>
        <task:scheduled ref="spaceStatisticsService" method="statisticSpace" cron="59 59 23 * * ?" />
    </task:scheduled-tasks>
实现代码:
@Service
public class SpaceStatisticsServiceImpl implements SpaceStatisticsService
{
    @Override
    public void statisticSpace()
    {
        System.out.println("实现定时功能");
    }
}
方案三:
在配置文件中添加:
<!-- 计划任务配置,用 @Service @Lazy(false)标注类,用@Scheduled(cron = "0 0 2 * * ?")标注方法 -->

    <task:executor id="executor" pool-size="10"/> <task:scheduler id="scheduler" pool-size="10"/>
   <task:annotation-driven scheduler="scheduler" executor="executor" proxy-target-class="true"/>
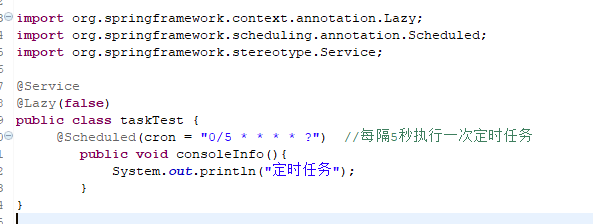
测试代码:
import org.springframework.context.annotation.Lazy;
import org.springframework.scheduling.annotation.Scheduled;
import org.springframework.stereotype.Service;

@Service
@Lazy(false)
public class taskTest {
	 @Scheduled(cron = "0/5 * * * * ?")  //每隔5秒执行一次定时任务
	    public void consoleInfo(){
	        System.out.println("定时任务");
	    }
}
注意:用 @Service @Lazy(false)标注类
扩展:定时时间的设置
如:“0/5 * * * * ?”
CronTrigger配置完整格式为: [秒] [分] [小时] [日] [月] [周] [年]
| 序号 | 说明 | 是否必填 | 允许填写的值 | 允许的通配符 |
|---|---|---|---|---|
| 1 | 秒 | 是 | 0-59 | , - * / |
| 2 | 分 | 是 | 0-59 | , - * / |
| 3 | 小时 | 是 | 0-23 | , - * / |
| 4 | 日 | 是 | 1-31 | , - * ? / L W |
| 5 | 月 | 是 | 1-12或JAN-DEC | , - * / |
| 6 | 周 | 是 | 1-7或SUN-SAT | , - * ? / L W |
| 7 | 年 | 否 | empty 或1970-2099 | , - * / |
通配符说明:
* 表示所有值. 例如:在分的字段上设置 "*",表示每一分钟都会触发。
? 表示不指定值。使用的场景为不需要关心当前设置这个字段的值。
例如:要在每月的10号触发一个操作,但不关心是周几,所以需要周位置的那个字段设置为"?" 具体设置为 0 0 0 10 * ?
- 表示区间。例如 在小时上设置 "10-12",表示 10,11,12点都会触发。
, 表示指定多个值,例如在周字段上设置 "MON,WED,FRI" 表示周一,周三和周五触发
/ 用于递增触发。如在秒上面设置"5/15" 表示从5秒开始,每增15秒触发(5,20,35,50)。 在月字段上设置'1/3'所示每月1号开始,每隔三天触发一次。
L 表示最后的意思。在日字段设置上,表示当月的最后一天(依据当前月份,如果是二月还会依据是否是润年[leap]), 在周字段上表示星期六,相当于"7"或"SAT"。如果在"L"前加上数字,则表示该数据的最后一个。例如在周字段上设置"6L"这样的格式,则表示“本月最后一个星期五"
W 表示离指定日期的最近那个工作日(周一至周五). 例如在日字段上设置"15W",表示离每月15号最近的那个工作日触发。如果15号正好是周六,则找最近的周五(14号)触发, 如果15号是周未,则找最近的下周一(16号)触发.如果15号正好在工作日(周一至周五),则就在该天触发。如果指定格式为 "1W",它则表示每月1号往后最近的工作日触发。如果1号正是周六,则将在3号下周一触发。(注,"W"前只能设置具体的数字,不允许区间"-").
# 序号(表示每月的第几个周几),例如在周字段上设置"6#3"表示在每月的第三个周六.注意如果指定"#5",正好第五周没有周六,则不会触发该配置(用在母亲节和父亲节再合适不过了) ;
小提示:
'L'和 'W'可以组合使用。如果在日字段上设置"LW",则表示在本月的最后一个工作日触发;
周字段的设置,若使用英文字母是不区分大小写的,即MON 与mon相同;
参考:
https://wuzhuti.cn/850.html/comment-page-1/
https://wuzhuti.cn/447.html
上一篇: 唯品会:授权流程说明
下一篇: frp内网穿透,怎么配置多客户端