Actor 模型入门与Akka-SpringBoot集成
- thingsboard
- 时间:2023-05-04 19:37
- 5011人已阅读
🔔🔔好消息!好消息!🔔🔔
有需要的朋友👉:微信号
在当今的数据处理和数据流水线系统中,将数据从源流传输到接收器是一项非常琐碎的任务。因此,有许多[流媒体]解决方案,例如:Kafka Stream,Spark Streaming,Apache Flink等。
Akka流在这场战斗中脱颖而出,并具有完全由应用程序驱动的优势。Akka流是在Akka著名的Actor模型(实际上是受Erlang的actor模型启发)的基础上构建的。因此,Akka流可以利用其经过战斗考验的弹性,弹性,事件驱动和响应能力。
Actor模型简介
Actor由状态(state)、行为(Behavior)和邮箱(mailBox)三部分组成
状态:Actor中的状态指的是Actor对象的变量信息,状态由Actor自己管理,避免了并发环境下的锁和内存原子性等问题
行为:行为指定的是Actor中计算逻辑,通过Actor接收到消息来改变Actor的状态
邮箱:邮箱是Actor和Actor之间的通信桥梁,邮箱内部通过FIFO消息队列来存储发送方Actor消息,接受方Actor从邮箱队列中获取消息
Actor 模型及其说明

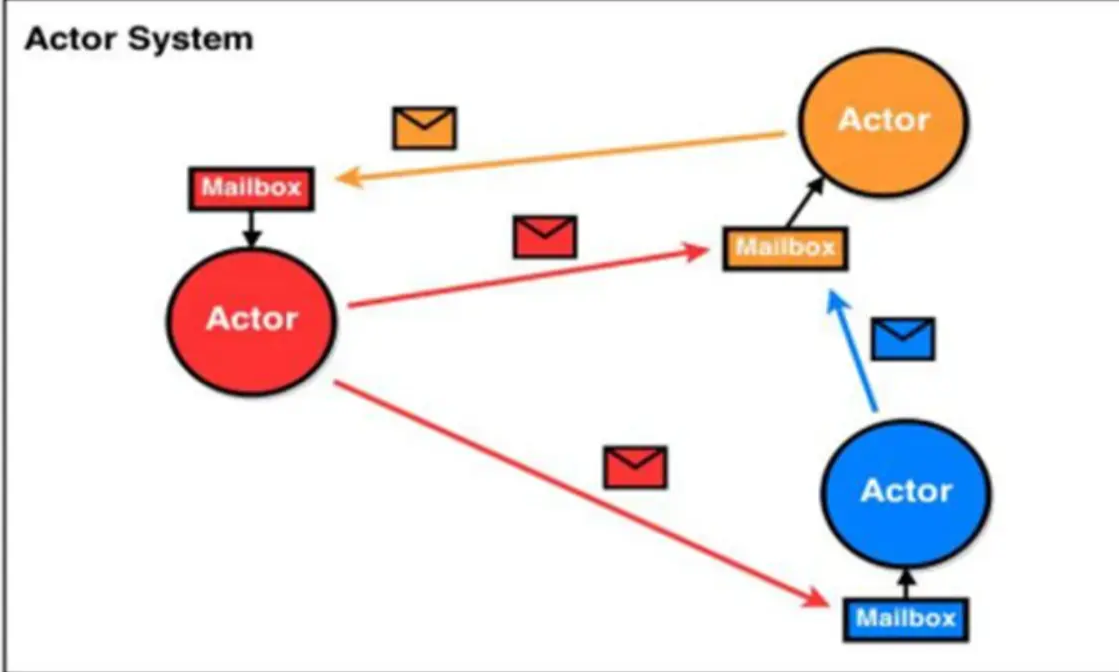
Akka 处理并发的方法基于 Actor 模型。(示意图)
在基于 Actor 的系统里,所有的事物都是 Actor,就好像在面向对象设计里面所有的事物都是 对象一样。
Actor 模型是作为一个并发模型设计和架构的。Actor 与 Actor 之间只能通过消息通信,如图 的信封
Actor 与 Actor 之间只能用消息进行通信,当一个 Actor 给另外一个 Actor 发消息,消息是有 顺序的 (消息队列),只需要将消息投寄的相应的邮箱即可。
怎么处理消息是由接收消息的 Actor 决定的,发送消息 Actor 可以等待回复,也可以异步处理 【ajax】
ActorSystem 的职责是负责创建并管理其创建的 Actor, ActorSystem 是单例的 (可以 ActorSystem 是一个工厂,专门创建 Actor),一个 JVM 进程中有一个即可,而 Acotr 是可以有多个的。
Actor 模型是对并发模型进行了更高的抽象。
Actor 模型是异步、非阻塞、高性能的事件驱动编程模型。[案例:说明 什么是异步、非阻塞,最 经典的案例就是 ajax 异步请求处理]
Actor 模型是轻量级事件处理 (1GB 内存可容纳百万级别个 Actor),因此处理大并发性能高.
Actor 模型工作机制说明

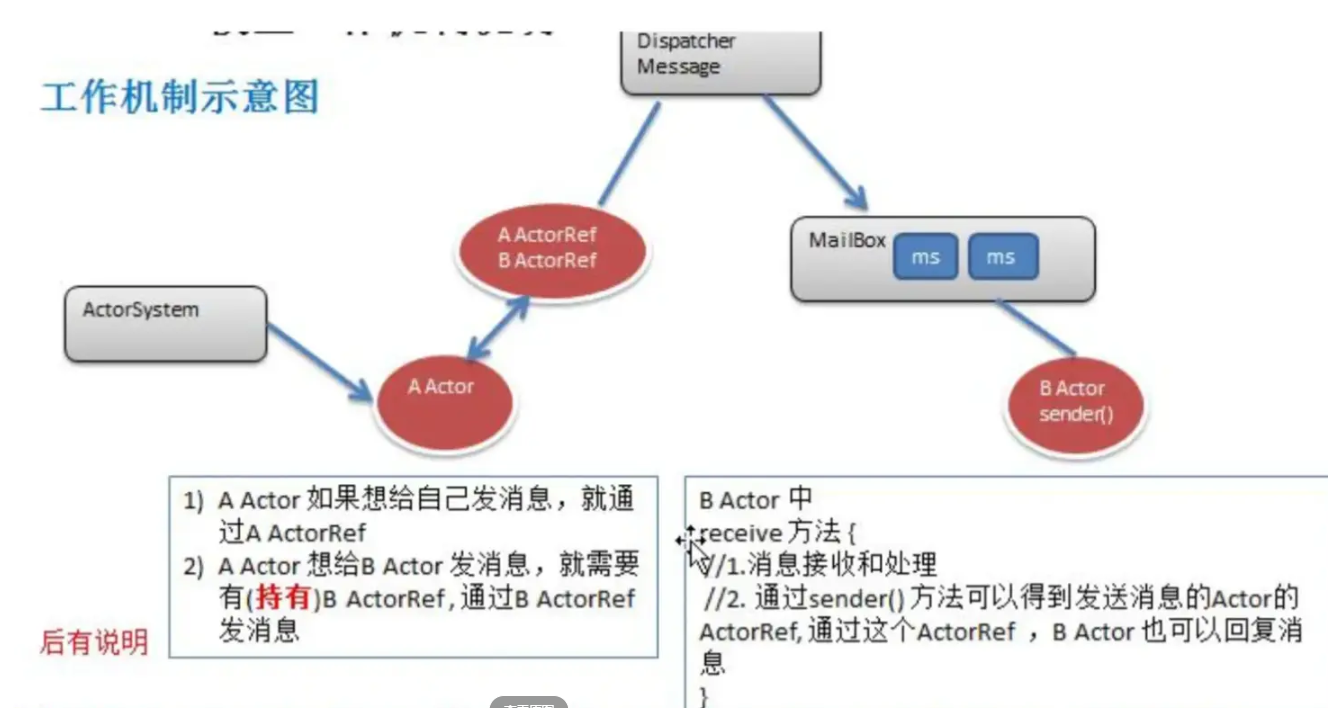
说明了 Actor 模型的工作机制 (对应上图)
ActorySystem 创建 Actor
ActorRef: 可以理解成是 Actor 的代理或者引用。消息是通过 ActorRef 来发送,而不能通过 Actor 发 送消息,通过哪个 ActorRef 发消息,就表示把该消息发给哪个 Actor
消息发送到 Dispatcher Message (消息分发器),它得到消息后,会将消息进行分发到对应的 MailBox。(注: Dispatcher Message 可以理解成是一个线程池,MailBox 可以理解成是消息队列,可以缓 冲多个消息,遵守 FIFO)
Actor 可以通过 receive 方法来获取消息,然后进行处理。 Actor 模型的消息机制 (对应上图)
每一个消息就是一个 Message 对象。Message 继承了 Runable, 因为 Message 就是线程类。 2) 从 Actor 模型工作机制看上去很麻烦,但是程序员编程时只需要编写 Actor 就可以了,其它的交 给 Actor 模型完成即可。
A Actor 要给 B Actor 发送消息,那么 A Actor 要先拿到 (也称为持有) B Actor 的 代理对象 ActorRef 才能发送消息
spring boot集成akka
根据自身的经验和理解,提供Akka与Spring集成的方案。本文不说明Spring框架的具体使用,并从Spring已经配置完备的情况开始叙述。
Actor系统——ActorSystem
什么是ActorSystem?根据Akka官网的描述——ActorSystem是一个重量级的结构体,可以用于分配1到N个线程,所以每个应用都需要创建一个ActorSystem。通常而言,使用以下代码来创建ActorSystem。
ActorSystem system = ActorSystem.create("Hello");不过对于接入Spring而言,由IOC(Inversion of Control,控制反转)方式会更接地气,你可以这样:
@Configurationclass ApplicationConfiguration {

    @Autowired
    private ApplicationContext applicationContext;

    @Autowired
    private SpringExtension springExtension;

    @Bean
    public ActorSystem actorSystem() {
        ActorSystem actorSystem = ActorSystem.create("actor-system", akkaConfiguration());
        springExtension.initialize(applicationContext);
        return actorSystem;
    }

    @Bean
    public Config akkaConfiguration() {
        return ConfigFactory.load();
    }}
然后在你需要的地方依赖注入即可。
Actor编程模型
我们可以通过以下代码(代码片段借用了Akka官网的例子)创建一个简单的Actor例子。
Greeter是代表问候者的Actor:
public class Greeter extends UntypedActor {

  public static enum Msg {
    GREET, DONE;
  }

  @Override
  public void onReceive(Object msg) {
    if (msg == Msg.GREET) {
      System.out.println("Hello World!");
      getSender().tell(Msg.DONE, getSelf());
    } else
      unhandled(msg);
  }}
一般情况下我们的Actor都需要继承自UntypedActor,并实现其onReceive方法。onReceive用于接收消息,你可以在其中实现对消息的匹配并做不同的处理。
HelloWorld是用于向Greeter发送问候消息的访客:
public class HelloWorld extends UntypedActor {

  @Override
  public void preStart() {
    // create the greeter actor
    final ActorRef greeter = getContext().actorOf(Props.create(Greeter.class), "greeter");
    // tell it to perform the greeting
    greeter.tell(Greeter.Msg.GREET, getSelf());
  }

  @Override
  public void onReceive(Object msg) {
    if (msg == Greeter.Msg.DONE) {
      // when the greeter is done, stop this actor and with it the application
      getContext().stop(getSelf());
    } else
      unhandled(msg);
  }}
有了Actor之后,我们可以这样使用它:
ActorRef a = system.actorOf(Props.create(HelloWorld.class), "helloWorld");
在HelloWorld的preStart实现中,获取了Greeter的ActorRef(Actor的引用)并向Greeter发送了问候的消息,Greeter收到问候消息后,会先打印Hello World!,然后向HelloWorld回复完成的消息,HelloWorld得知Greeter完成了向世界问好这个伟大的任务后,就结束了自己的生命。HelloWorld的例子用编程API的方式告诉了我们如何使用Actor及发送、接收消息。为了便于描述与Spring的集成,下面再介绍一个例子。
CountingActor(代码主体借用自Akka官网)是用于计数的Actor,见代码清单所示。
@Named("CountingActor")@Scope("prototype")public class CountingActor extends UntypedActor {

    public static class Count {
    }

    public static class Get {
    }

    // the service that will be automatically injected
    @Resource
    private CountingService countingService;

    private int count = 0;

    @Override
    public void onReceive(Object message) throws Exception {
        if (message instanceof Count) {
            count = countingService.increment(count);
        } else if (message instanceof Get) {
            getSender().tell(count, getSelf());
        } else {
            unhandled(message);
        }
    }}
CountingActor用于接收Count消息进行计数,接收Get消息回复给发送者当前的计数值。CountingService是用于计数的接口,其定义如下:
public interface CountingService {

    /**
     * 计数
     * @param count
     * @return
     */
    int increment(int count);
 }
CountingService的具体实现是CountingServiceImpl,其实现如下:
@Service("countingService")public class CountingServiceImpl implements CountingService {

    private static Logger logger = LoggerFactory.getLogger(CountingServiceImpl.class);

    /*
     * (non-Javadoc)
     *
     * @see com.elong.sentosa.metadata.service.CountingService#increment(int)
     */
    @Override
    public int increment(int count) {
        logger.info("increase " + count + "by 1.");
        return count + 1;
    }
 }
CountingActor通过注解方式注入了CountingService,CountingActor的计数实际是由CountingService完成。
细心的同学可能发现了CountingActor使用了注解Named,这里为什么没有使用@Service或者@Component等注解呢?由于Akka的Actor在初始化的时候必须使用System或者Context的工厂方法actorOf创建新的Actor实例,不能使用构造器来初始化,而使用Spring的Service或者Component注解,会导致使用构造器初始化Actor,所以会抛出以下异常:
akka.actor.ActorInitializationException: You cannot create an instance of [com.elong.metadata.akka.actor.CountingActor] explicitly using the constructor (new). You have to use one of the 'actorOf' factory methods to create a new actor. See the documentation.
如果我们不能使用@Service或者@Component,也不能使用XML配置的方式使用(与注解一个道理),那么我们如何使用CountingActor提供的服务呢?
IndirectActorProducer接口
IndirectActorProducer是Akka提供的Actor生成接口,从其名字我们知道Akka给我们指出了另一条道路——石头大了绕着走!通过实现IndirectActorProducer接口我们可以定制一些Actor的生成方式,与Spring集成可以这样实现它,见代码清单所示。
public class SpringActorProducer implements IndirectActorProducer {
    private final ApplicationContext applicationContext;
    private final String actorBeanName;
    private final Object[] args;

    public SpringActorProducer(ApplicationContext applicationContext, String actorBeanName, Object ... args) {
        this.applicationContext = applicationContext;
        this.actorBeanName = actorBeanName;
        this.args = args;
    }

    public Actor produce() {
        return (Actor) applicationContext.getBean(actorBeanName, args);
    }

    public Class<? extends Actor> actorClass() {
        return (Class<? extends Actor>) applicationContext.getType(actorBeanName);
    }}
SpringActorProducer的实现主要借鉴了Akka官方文档,我这里对其作了一些扩展以便于支持构造器带有多个参数的情况。从其实现看到实际是利用了ApplicationContext提供的getBean方式实例化Actor。
这里还有两个问题:
一、ApplicationContext如何获取和设置?
二、如何使用SpringActorProducer生成Spring需要的Actor实例?
      对于第一个问题,我们可以通过封装SpringActorProducer并实现ApplicationContextAware接口的方式获取ApplicationContext;
   对于第二个问题,我们知道Akka中的所有Actor实例都是以Props作为配置参数开始的,这里以SpringActorProducer为代理生成我们需要的Actor的Props。

   SpringExt实现了以上思路,见代码清单所示。
@Component("springExt")public class SpringExt implements Extension, ApplicationContextAware {

    private ApplicationContext applicationContext;

    /**
     * Create a Props for the specified actorBeanName using the
     * SpringActorProducer class.
     *
     * @param actorBeanName
     *            The name of the actor bean to create Props for
     * @return a Props that will create the named actor bean using Spring
     */
    public Props props(String actorBeanName, Object ... args) {
        return Props.create(SpringActorProducer.class, applicationContext, actorBeanName, args);
    }

    public void setApplicationContext(ApplicationContext applicationContext) throws BeansException {
        this.applicationContext = applicationContext;
    }}
应用例子
经过了以上的铺垫,现在你可以使用创建好的CountingActor了,首先你需要在你的业务类中注入ActorSystem和SpringExt。
@Autowired
    private ActorSystem actorSystem;

    @Autowired
    private SpringExt springExt;
然后我们使用CountingActor进行计数,代码如下:
ActorRef counter = actorSystem.actorOf(springExt.props("CountingActor"), "counter");

// Create the "actor-in-a-box"
final Inbox inbox = Inbox.create(system);

// tell it to count three times
inbox.send(counter, new Count());
inbox.send(counter, new Count());
inbox.send(counter, new Count());

// print the result
FiniteDuration duration = FiniteDuration.create(3, TimeUnit.SECONDS);
Future<Object> result = ask(counter, new Get(), Timeout.durationToTimeout(duration));
try {
System.out.println("Got back " + Await.result(result, duration));
} catch (Exception e) {
System.err.println("Failed getting result: " + e.getMessage());
throw e;
}
输出结果为:
Got back 3
此处为自己给自己发消息。
小结
本文只是最简单的Akka集成Spring的例子,Akka的remote、cluster、persistence、router等机制都可以应用。
参考:
https://blog.csdn.net/IoTSchool?type=blog
作者:老鼠AI大米_Java全栈